

What you’ll accomplish
By the end of this guide, you’ll have:- ✅ Secure API integration setup
- ✅ Complete create → poll → download workflow
- ✅ Robust error handling
- ✅ Production-ready patterns
Before you start
Prerequisites:- API key from Developer Hub
- Your preferred SDK installed or direct HTTP client ready
Integration overview
Choose the workflow that matches what you are building:- Start with
generate()for quick scripts and prototypes. It creates the job, polls for completion, and can download the output for you. - Use
create()with webhooks or background polling for production apps. It returns immediately so your server can track multiple jobs without holding requests open.
create() workflow. If you are still learning the API, complete the
Quick Start with generate() first.
Magic Hour APIs follow a simple 3-step pattern that applies to all content generation:
Step 1: Create Job
Purpose: Submit your generation request to the API Relevant APIs:- Video APIs:
POST /v1/face-swap,POST /v1/lip-sync,POST /v1/animation,POST /v1/text-to-video, etc. - Image APIs:
POST /v1/ai-image-generator,POST /v1/face-swap-photo,POST /v1/ai-headshot-generator, etc. - Audio APIs:
POST /v1/ai-voice-generator
queued)
Python SDK
Production application pattern
Best for: Web apps, APIs, multiple concurrent jobsStep-by-step integration guide
Let’s build a complete face swap integration step by step:Step 1: Set up the API client
What this does: Creates a configured Magic Hour client for making API callsStep 2: Create the job
What this does: Submits a face swap request and gets a project ID to track progressStep 3: Monitor job status
What this does: Checks if the job is complete and handles different status statesStep 4: Download results
What this does: Downloads the generated video when the job completes successfullyStep 5: Put it all together
What this does: Combines all steps into a complete workflow functionWorking with input files
Magic Hour accepts input files in two ways:Option 1: URL references (Recommended)
The simplest approach is to pass file URLs:- Images: PNG, JPG, JPEG, HEIC, HEIF, WEBP, AVIF, JP2, TIFF, BMP
- Videos: MP4, M4V, MOV, WEBM
- Audio: MP3, WAV, AAC, FLAC, WEBM, M4A, OPUS, OGG, AIFF, AMR
Option 2: Upload to Magic Hour
For secure or temporary files, upload directly to Magic Hour storage:Inputs and Outputs Guide
Complete guide to file uploads, formats, and storage options
Understanding job status
Every job goes through these states:
Recommended polling intervals:
- Images: Check every 2-3 seconds (usually complete within 30-60 seconds)
- Videos: Check every 5-10 seconds (can take 2-5 minutes depending on length)
Error handling
When a job fails (status: "error"), the response includes detailed error information:
Error handling example
For
unknown_error codes, contact support@magichour.ai with your
project ID for investigation.Status monitoring strategies
Choose the right approach based on your application’s needs:Option 1: Webhooks (Recommended for production)
Get real-time notifications when jobs complete. Best for:- ✅ Production applications
- ✅ Video processing (longer render times)
- ✅ Multiple concurrent jobs
- ✅ Better server resource usage
Webhook Setup Guide
Complete webhook implementation guide with examples
Option 2: Polling (Good for simple use cases)
Periodically check job status. Best for:- ✅ Simple integrations
- ✅ Single job processing
- ✅ Image generation (quick results)
Downloading results
When a job completes, thedownloads array is populated with secure, time-limited URLs:
Download outputs
Multiple outputs handling
Some tools generate multiple files (e.g., multiple images):File management
Cleaning up storage
Generated files are stored indefinitely. Clean up completed jobs to manage storage:Development and testing
Free testing with mock server
Avoid credit charges during development by using the mock API server:The mock server returns realistic sample data without processing jobs or charging credits.
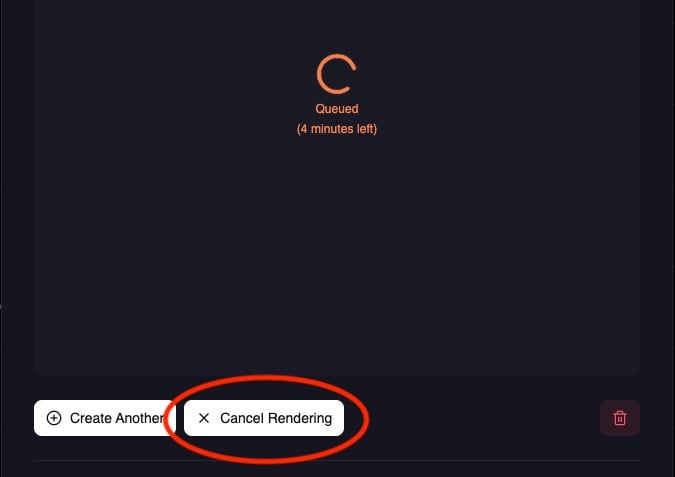
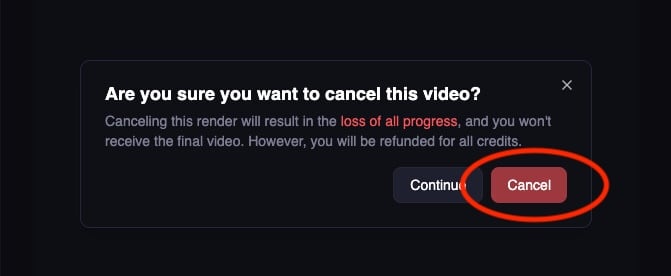
Job cancellation
Cancel video jobs (with full refund) via the web dashboard:1
Open project details
Visit the project in your library: - Videos:
https://magichour.ai/my-library?videoId= {project_id} - Images: https://magichour.ai/my-library?imageId={project_id} - Audio:
https://magichour.ai/my-library?audioId={project_id}2
Click cancel render
3
Confirm cancellation
4
Cancellation complete

- Image jobs cannot be cancelled (they complete too quickly)
- API-based cancellation is not currently available
- Full credit refund is provided for cancelled video jobs
Next steps
Webhook Integration
Set up real-time notifications for production apps
API Reference
Explore all available endpoints and parameters
Google Colab Cookbook
Try all 22 APIs with ready-to-run examples
File Management
Advanced file upload and management techniques
Need help? Join our Discord community or email support@magichour.ai